Product Support

Get help with products

Stuck on how to use one of our products?
Not sure how to clean them?
Find all the useful support information right here.

Natural Start Silicone Baby Bottle


Natural Start Silicone Baby Bottle

Getting Started

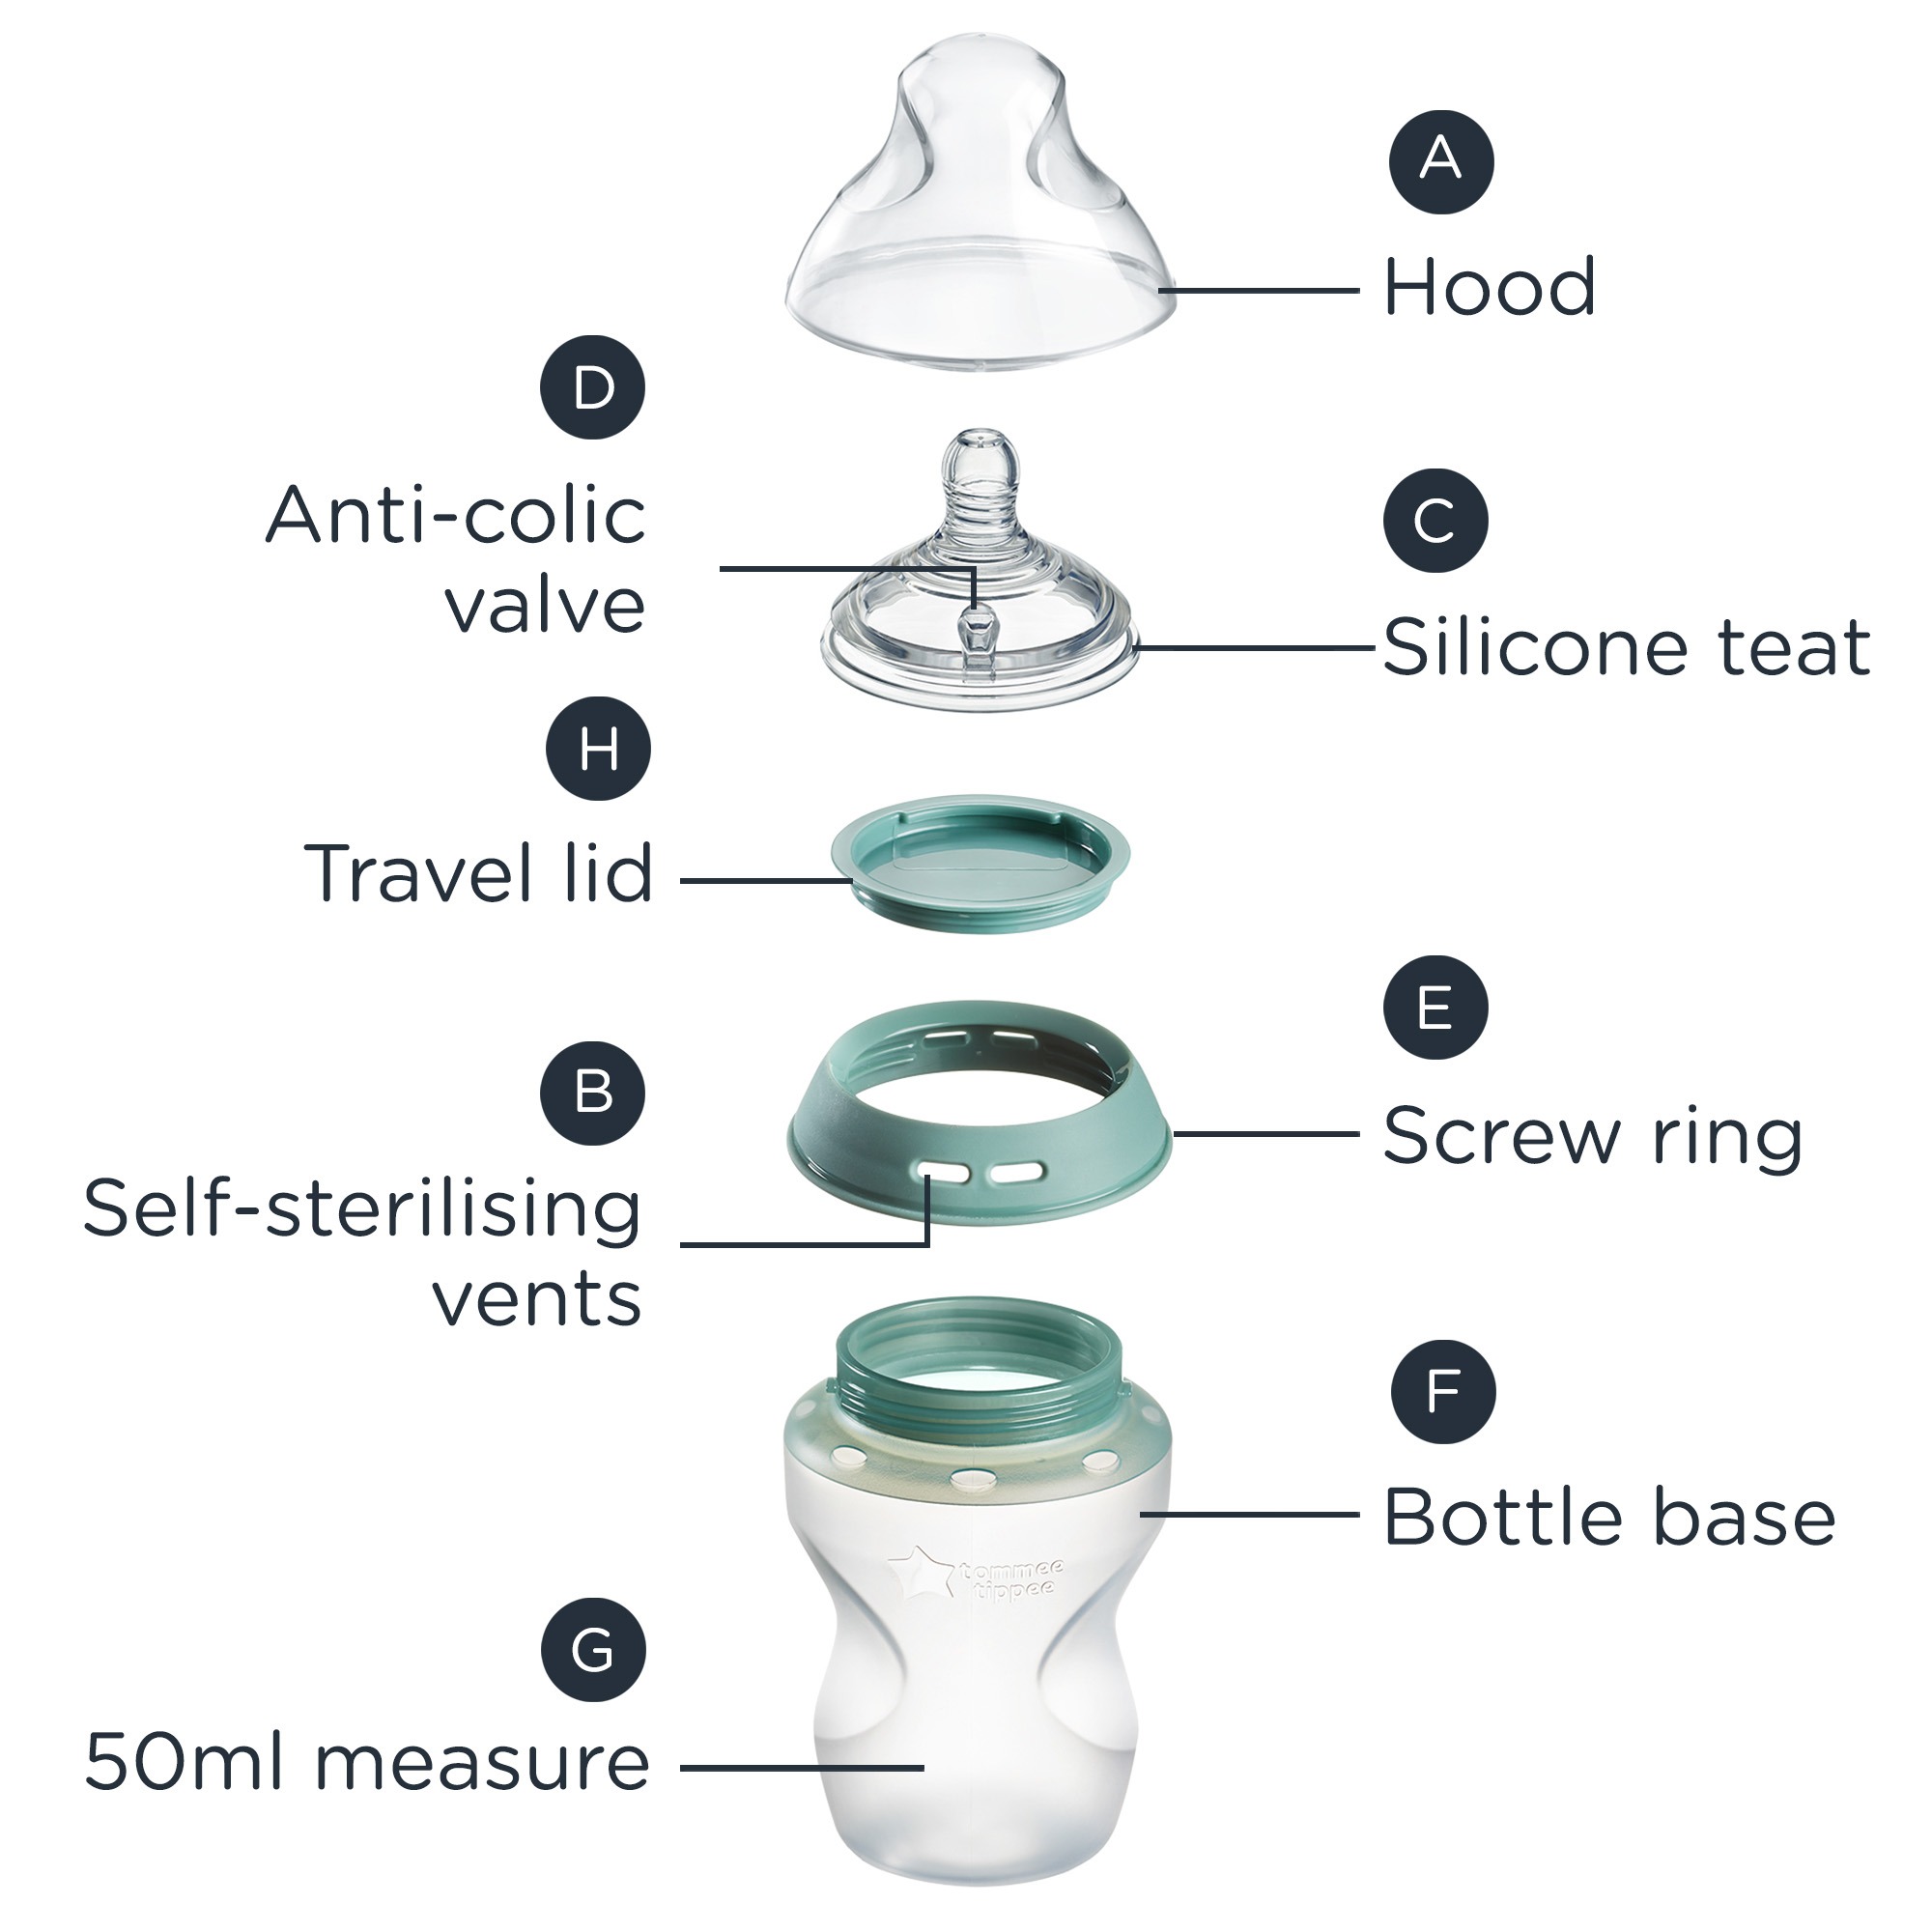
Parts guide

Exploded diagram of a silicone bottle which is labled

How to Use

Preparing for use

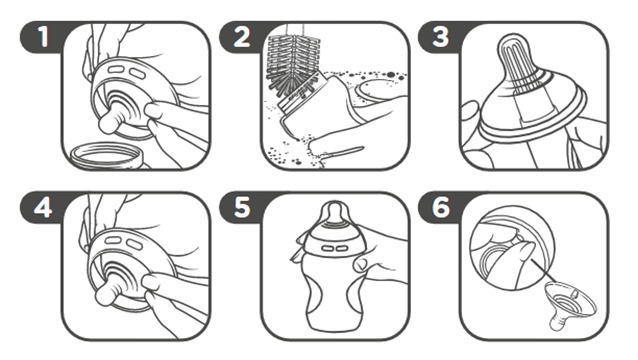
Diagram showing steps 1 - 6 of how to clean Natural start silicone bottle

  1. Disassemble your bottle.
  2. Wash all you parts in warm soapy water and rinse or use a dishwasher (top shelf only).
  3. Use a teat brush to gently clean the teat (C), do not turn inside out as you may damage it. Do not clean feeding hole or anti colic valve (D) with the brush as this may cause damage.
  4. Reassemble your teat (C) and screw ring (E) and then place all parts in boiling water for 5 minutes or use another method of sterilization such as microwave (see below), UV or steam sterilizer or cold water tablet/liquid solution (ensure you follow the manufacturer’s instructions).
  5. After sterilizing reassemble your bottle ready for use.
  6. To prevent the teat (C) from collapsing during feeding, pinch the valve (D) gently between your fingers to ensure it’s open.


How to self-sterilize in a microwave

This method allows you to easily sterilise bottles using a microwave. Before sterilizing, always disassemble and wash all components thoroughly and rinse in clear water or use dishwasher (top shelf only).

Remove the travel lid before self-sterilizing. Ensure the travel lid is thoroughly washed before use.
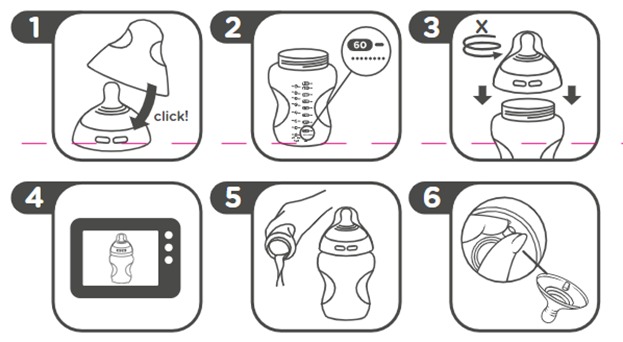
Diagram showing steps 1 - 6 of how to sterilize Natural start silicone bottle

  1. Assemble the teat (C) in the screw ring (E) and click the bottle hood (A) in place.
  2. Pour exactly 50ml of water into the bottle base (F). The bottles have a 50ml measure (G).
  3. Rest the assembled hood (A), teat (C) & screw ring (E) on top of the base (F). Do not tighten on to the base.
  4. Place in the microwave for 3 minutes. To sterilize multiple bottles see table below. Allow the bottles to cool down for at least 5 minutes before removing from microwave.
  5. Pour out residual water and screw the assembled hood (A), teat (C), and screw ring (E) on to the bottle base (F) ready for use. After self-sterilization the bottle and teat will remain sterile for 24 hours if the bottle is unopened and fully assembled. Always store the bottles fully assembled.
  6. To prevent the teat (C) from collapsing during feeding, pinch the valve (D) gently between your fingers to ensure it’s open. Microwave recommended times for all bottle sizes.  Based on microwaves from 700 to 1000 Watts.

Sterilizing table guidelines

Storage and use

  • Inspect before each use and pull the feeding teat in all directions.
  • Always clean and sterilize before each use.
  • Keep away from solvents or harsh chemicals.
  • Do not allow the product to come into contact with oil based foods.
  • Not suitable for use in a conventional oven or a combination microwave oven with the grill feature switched on.
  • Do not leave a feeding teat in direct sunlight or heat, or leave in disinfectant (sterilizing solution) for longer than recommended, as this may weaken the nipple.
  • Teats are recommended to be replaced at lease every 2 months for safety and hygiene reasons.
  • Please dispose of this product and packaging responsibly.

How to Clean

How to clean

  1. Disassemble your bottle
  2. Wash all parts in warm soapy water and rinse or use a dishwasher (top shelf only).
  3. Use a teat brush to gently clean the teat (C). Do not turn it inside out as this may cause damage. Do not clean the feeding hole or anti colic valve (D) with the brush as damage may occur.
  4. Reassemble your teat (C) and screw ring (E) and then place all the parts in boiling water for 5 minutes or use another method of sterilization such as microwave (see below), UV or steam sterilization or cold water tablet/liquid solution.
  5. After sterilizing, reassemble your bottle ready to use.
  6. To prevent the teat (C) from collapsing during feeding, pinch the valve (D) gently between your fingers to ensure it’s open.

Troubleshooting and FAQs

Can I use Advanced Anti-Colic teats on Natural Start silicone baby bottles?

The simple answer is no, due to the different valves. Most of our products have interchangeable parts to make life as simple as possible. But the Natural Start Teats have a built-in air valve, and don’t work properly on our Advanced Anti-Colic bottles.


Where should the valve be when I’m feeding my baby?

The valve will work wherever it’s positioned but the best place for the valve is at the top, near your baby's nose.


Can I buy bottles with faster flowing teats?

Our Natural Start Silicone Baby Bottles come with slow flow teats as standard, as they’re best for newborns and most parents generally stock up on bottles before baby arrives.

As your baby grows and can feed more quickly, you can buy faster flowing replacement teats.

We have medium flow teats, which most babies are ready for at around 3 months, and a fast flow teat which is best from around 6 months. The ages are only guides though - you know your baby better than anyone and will be able to tell when they’re ready for a faster flow.


I've heard bad things about BPA - Is it in your bottles? (& What is it anyway?)

All Tommee Tippee bottles are BPA-free. These bottles are made of Silicone but are BPA free for your reassurance. BPA - that’s (CH₃)₂C(C₆H₄OH)₂ for you science geeks - is a chemical that’s been used in some plastics since the 1960s and it’s believed to mess around with your hormones. It’s generally not good, so we don’t use it.


Can I store breast milk in bottles?

Yes, our bottles love to look after your breast milk. We even have special lids that you can pop on to store your milk in the fridge or freezer. If you’re expressing and storing breast milk, our Express and Go™ range may be handy too - it features a clever pouch that you use to express, store, warm and feed (it’s our all in one show). This means there’s no need to transfer milk at any stage, so you’ll never lose a precious drop.


Can I recycle my bottles when I'm done?

Yes. Our Natural Start Silicone Baby Bottles are made from Silicone and can be recycled.


Why are there small holes in the screw ring? 

The small holes allow the steam to reach the external surface of the teat and the internal surface of the hood.

PLEASE NOTE: It’s important that the silicone teat is not tighten on to base when self-sterilizing in a microwave to allow the steam to flow.


How does the self-sterilizing function work? 

The 50ml of water in the bottle will turn into steam when microwaved*. The steam reaches the temperature necessary to sterilize, killing virus and 99.9% of bacteria. The steam travels around the bottle and through the holes in the screw ring to reach the external surface of the teat and the internal surface of the hood.

*Based on microwaves from 700 to 1000 Watts. 

PLEASE NOTE: It’s important that the silicone teat is not tighten on to base when self-sterilizing in microwave to allow the steam to flow.

The silicone bottles come with a handy travel lid to stop any unwanted leaks on the go. Please ensure the travel lid is thoroughly washed and dried before use.

Remove travel lid when self-sterilizing in a microwave.